Mastering the Techniques of Highlighting and Contouring 🖌
Highlighting and contouring have become essential skills in the world of makeup artistry. These techniques not only enhance the features of the face but also add depth and dimension, allowing individuals to express their unique beauty. Whether you are a makeup novice or a seasoned pro, understanding how to effectively highlight and contour can elevate your makeup game.
What is Highlighting?
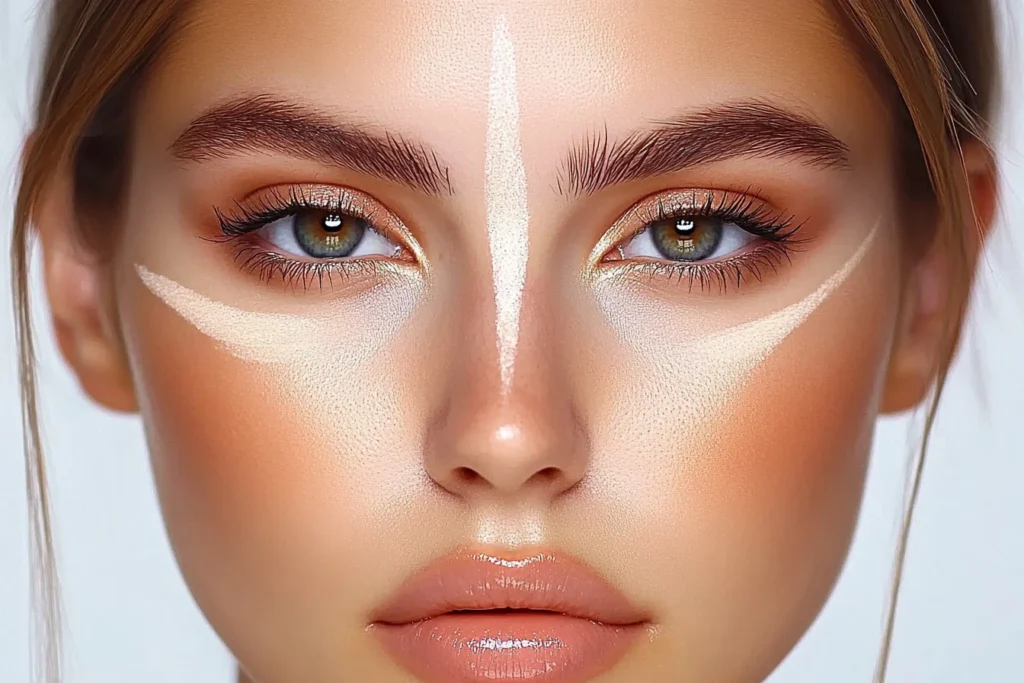
One of those is they are highlights, meaning that you put lighter makeup on the high points of your face where light normally would. People of all ages use it to create a glowing effect that makes their skin appear younger and more radiant. Consider emphasizing the following areas:
- The tops of the cheekbones
- The bridge of the nose
- The brow bone
- The center of the forehead
- Cupid’s bow (the area just above the upper lip)
Opt for products with a shimmer or dewy finish to get your highlight on fleek. Depending on the type of skin you have and what suits your preference, makeup artists utilize liquid highlighters or cream formulas in some videos.
Understanding Contouring
Whereas contouring is based more on creating shadows on the face to define and form it. A deeper darker shade will naturally bring out and contour your features. Contouring stepsYou must contour these areas
- The hollows of the cheeks
- The sides of the nose
- The jawline
- Forehead (to minimize)
Opt for matte contour products a few shades darker than your natural color. Creams and powders both work well, just make sure you blend them in for a flawless look.
Tools of the Trade
Like anything the right tools are everything — YOU have to be armed and prepared! Some of the essentials to consider:
- Flat Brush: It is used for applying highlighter on a broader area.
- Small Brush: meant for small areas of highlighting and contouring, like the side of your nose.
- Beauty Blender or Makeup Sponge — can blend cream products to a soft finish.
- Contour Brush: A pointed brush that aids in placing your contour exactly where you need it.
Application Tips
- Prep Your Skin: This should be done with a clean face that is freshly moisturized. PrimerPrep your face before applying makeuo.
- Map It Out – Before you start applying products, imagine where on your face exactly do you wanna place the highlight and contour. That way, you will have a balanced outfit.
- Gradually Layering: Use a little and add more as necessary. You can add more but taking off excess make-up is much harder and not as effective.
- Gradual, Gradual, Gradual Blend: The key to a natural-looking finish is blending. This way, you can make sure your highlight and contour do their thing in the most beautiful way possible.
- Photo Credit: Beauty And The Boutique Set Your Makeup : To make sure that your hard work stays put and in place all day, use a setting spray or apply some translucent powder to lock everything down.
Conclusion
It turns out, highlighting and contouring are those transformative methods that will show your best; It all can be learned, everyone just need to practice and experiment. After all, these are meticulous practices you should also master on! Most importantly, remember to have fun and feel good! So, Happy Highlighting and Contouring! 🖌